Thursday, May 13, 2021

My two One-Year-Old Thomcords and the Modified Munson Trellis System

During the summer of 2020 I purchased two Thomcord table grape vines from Double A Vineyards. Not a huge purchase, but I am backyard-kinda gardener and, in terms of space, that's all I can afford. Our whole property, including the house, is 1/3 of an acre.

First, let me explain why I purchased Thomcords instead of any other type of grape vine. I grew up in Korinthos, Greece and in that region they grow Sultana or Sultanina table grapes. This grape is perfect for making Chablis-type of wine AND amazingly sweet, voluminous raisins. My parents would buy these raisins by the case (τελάρο), because of their taste and in that region local raisins were very inexpensive. They would have the case set by the kitchen exit door and I would stuff my pockets with them and run out to play. Also, my mom would often make dolmades and I remember her calling me and asking me to go to the backyard to get grape leaves for her. Good times! 

In the US the Thompson grape variety is equivalent to the Sultanina and it grows in zones 7 - 9. I live in New York, America, and the zone in my town is at best 6a. This means that the Thompson grape vine will never survive the harsh winters. But wait, there is more! HOWEVER, the Thomcord variety is a cross between Thompson and Concord and it well suited for cold climates. BINGO

Well, I love to cook and I want to make dolmades using the same leaves as the ones my mom used back in my Korinthos days. Please note that I use Korinthos and not Corinth because Korinthos is the correct name of the town, but I digress.

In general, table grapes require a different trellis system that that of wine grapes. Double A Vineyards recommend the Modified Munson trellis

The image below shows four wires strung between two posts. I've created several videos about this system, ref 1, ref 2 and I will not cover that material here. 

(Image referenced from https://extension.unh.edu/sites/default/files/pictures/figure4.png)
 

As the vine grows, you will need to train it and "send" two cordons to the left and two to the right starting form the head of the vine. Then, as the vine will grow, you will further send canes that grow from the cordons to drape over the outer wire of the Munson system.

Here is the beginning of the "training". This Thomcord vine image shown below is about one year old. 


The same vine is shown here while I was working on adding the twine. 

Below I show the second vine that I've planted. This vine had a rough start because I didn't pay close attention after I planted it and it had several slugs munching on the leaves. After I "relocated" the slugs, it started to grow again.  


The image below shows the marginal growth after the vine's first winter. 


Normally, you should clear all leaves that grow on the trunk of the vine because that growth will rob energy from going to the grapes. As I said in the beginning, the primary reason for this is to get leaves to make dolmades and I will not trim the leaves. 

Happy gardening! 


Tuesday, April 13, 2021

PSA: All Greeks stay home every Tuesday the 13th

Tuesday the 13th is the same as Friday the 13th for Greeks. This is not just triskaidekaphobia, it stems from the fall of Constantinople (Constantinople is now known as Istanbul) in 1453. 

Turks invaded Constantinople on May 29, 1453, which was a Tuesday and if you add up 1+4+5+3 you get 13. Kind of strange to come up with Tuesday the 13, but I am just the messenger,

Here is a side note about Greek language. First the history. Constantinople was protected by a wall that surrounded the city, however there was a tiny portal called Kerkoporta that was left open and a few Turkish soldiers came in from there and the rest is history. So, you can call an entryway "Kerkoporta" you want to convey a message of "weak defence" or simply a "difficult entry way" or a "tiny door". Only a Greek who attended Greek schools will know this trivial fact, but you know me and it's just the same. 

Stay home today!

Monday, April 12, 2021

Look ma, my asparagus is growing!

Three years ago I purchased Mary Washington asparagus seeds, a variety that is hardy enough for zone 6a, from Rare Seeds. I followed their instructions and all seeds sprouted! I dedicated a whole bed for it, but I didn't plant all 25 because there was no room for them. I planted 12 of them and I gave the rest to a friend. 

The first two seasons I did not the harvest any asparagus spears because you want to develop a strong root system. The first year I saw the ferns grow to be about four feet tall and the asparagus spears grew to about two feet tall. The spears were too thin, though. The first fall, in preparation for the New York winter, I mulched the bed heavily with straw and hay after the fers had died back and I cut them to the ground. The second summer the spears looked much stronger and got really tall. There were spears that were as tall as I am, 5' 10", however that's not a reliable measure because I've been shrinking stradily, but I digress. 

That following late fall/early winter again I mulched the bead heavily after the ferns had died back. During both winters we got a considerable amount of snow, but the plants survived and proved that this variety is indeed very hardy. 

During both summers the ferns got to be so tall that I had to devise a method to hold the ferns upright and not falling on the ground and possibly breaking. I wanted the asparagus to benefit from the sun's energy. Here are a few YouTube videos that I created for my asparagus:

  1. Supporting the ferns.

  2. Winterizing the bed.

  3. Early spring bed maintenance.
This morning, after almost 24 hours of steady, slow, rain I went outside and walked around the garden and I saw several spears that had sprouted! The spears are nice and thick and I'm already planning the first dish where asparagus is the star of the show. 


Please note that I prescribe to the Ruth Stout philosophy where you mulch your garden heavily with straw or leaves or hay. If you are not familiar with this gardening methodology please go to your local library and check out this author's books.

Happy gardening!


Friday, April 2, 2021

Recipe for Greco-Roman Chicken Scaloppini

For dinner tonight I made my "world famous" Greco-Roman Chicken Scaloppini


Ingredients

Three medium skinless, boneless chicken breasts sliced not too thin, pounded thinly and dipped lightly in all-purse flour. 

Three cups of sliced baby Bella mushrooms. 

Four medium shallots diced. 

Three tablespoons of my own sun dried cherry tomatoes with some of their oil. 

Two cups of sweet peas. 

Four cloves of garlic. I used my own that I grew last year. It’s a popular variety called Music and it’s just delicious. 

3/4 cup vegetable stock, chicken stock will be even better. 

1/2 wine. I use Riesling made locally at the Brotherhood Winery.  

Olive oil

Butter

Salt and pepper 

About 3/4 cup of all-purpose flour  

Eventually I made pasta and topped it with the chicken Scaloppini  

Directions

Remove any excess fat from the chicken breasts, slice them, pound them thin and dip them in the flour. Please remember that we’re not making Kentucky Fried Chicken here, take it easy with the flour. 

I sliced the mushrooms, onions, sun dried tomatoes, garlic and parsley. Slice the garlic a bit wide not too thin. 

I used a non-stick pan and added about 1/4 cup of olive oil and a tablespoon of butter. Once the oil and butter were nice and hot I added the chicken. Once the edges of the chicken changed color I turned them over and cooked for one more minute. I set the chicken aside, covered. 

In the same pan I added the onions, cooked them for two minutes and then added the garlic and cooked for another minute. 

Then, I added the sliced mushrooms and cooked them for about five minutes. Added a little pepper, to taste. 

I added the sun dried tomatoes along with their oil. When I dried them last year I added a nice sprinkle of salt, so don’t over salt your food when using sun dried tomatoes.

I mixed everything nicely and then added the Riesling wine followed by the vegetable stock and the sweet peas. Brought everything to a nice boil and added the chicken. I added about two tablespoons of butter and mixed everything nicely  

Ahead of time I added the stock in a pot and kept it warm there. You don’t want to add stock while cooking straight from the refrigerator. The same with the sweet peas that were frozen. I took them out of the freezer before I started and by the time I needed them they were at room temperature. 

I cooked it for another 10 minutes allowing some of the liquid to evaporate and the sauce to thicken up. Don’t forget that the chicken has a nice coating of flour that will help thickening the sauce  

The day before I made two traditional loaves of Greek flat bread called Lagána, Λαγάνα. I sliced thinly three pieces off the bread and toasted them lightly.

The pasta was perfectly cooked, the chicken was ready, the Lagána slices were ready and Alexa was playing Dr. Zhivago.

Dinner was fit for a king.

Yum!

Happy cooking!


Thursday, April 1, 2021

Preparing my Honeoye strawberry bed after the winter

Two years ago I purchased 25 Honeoye (pronounced like "honey-oy) strawberry plants because they are cold hardy for NY and they are good producers of fruit. The first summer, after the planting, I just trimmed the flowers and the runners RELIGIOUSLY and for that reason we did not enjoy any strawberries. That was done so the plants would create strong root system. Last year, though, we collected at least 14 quarts of strawberries. I covered them with chicken wire and protected them from the squirrels and birds. 

Last November I weeded the bed and covered them with 10" of straw. The stayed there, covered in snow all winter. Now though, that there is no chance of snow the time has come for me to clean up the bed.

First, let me say that most materials I used to create the beds were either free or purchased form Restore in Newburgh.

The following picture shows the bed after I removed the thick layer of straw. After removing the straw I placed it temporarily close to this bed because I would need it to add it to the strawberry bed.

Here I am removing any dead strawberry branches and weeds. I try not to disturb the light coating of straw that exists between the strawberries. Last year I noticed that all of my weeds grew right next to the edge of the bed and there was very little straw there covering the dirt. Live and learn.


Here I am adding straw back to the bed. You can see on the left side of the screen the pile of straw that I removed from the strawberry bed. I used most of that to add it back between the plants and the edges of the bed. It's not hard work, but it helps if you have something to kneel on, like my yoga mat.


Here I'm adding more straw around and on top of the plants. The layer that I've added on top is loose and the plants will grow nicely. 


The whole process took less than 45 minutes. There were quite a few dead branches that I've removed and quite a few weeds. Also I pulled about six or seven plants that I already gave my good neighbors. They have been very generous with contributing many buckets a leaves for my beds. Good stuff. 

Happy gardening! 


Got me some goodwood chips for my compost

Today I was driving down the street and saw Logan working in a neighbor’s yard chipping small logs. Drove quickly back home, got four five-gallon buckets and went back to see Logan.

The wood chips will aerate the compost and will speed up the decomposition process. A compost needs three things: organic matter, moisture, and air. If you remove one of the three elements, the decomposition process comes to a halt, worms don’t stay and it will take a couple of years for it to decompose.

These are 'the boys". I would have packed them better, but I didn't want to appear to be a wood chip hog. 


I took one bucked at a time and slowly incorporated it into the compost. 


Folks, believe you me, it's not easy turning the compost, but you gotta do it. The chunks of wood and the turning of the compost will aerate it. This process is called aerobic composting and it's well worth it.


Twenty minutes later I was done. The compost heap was fuller, I was happier and the buckets were empty. 


Happy composting and keep your worms happy!


Sunday, March 28, 2021

Getting Lots of High Quality, Free Dirt - My Compost Heap Problem

Two years ago we had to cut down our 100+ year old Pin Oak tree because its roots were compromised after a storm that went through our village. The tree was just magnificent and we really miss it. Every fall it would drop loads of leaves that I would collect and add to my compost heap. The leaves added with other organic matter would provide me with lots of high quality dirt. 

Well, 'If the mountain will not come to Muhammad, then Muhammad must go to the mountain'. When my neighbors clean up their yards guess who's collecting their bags full of pure gold. Of course I return their bags and help the environment is a tiny way. 


I have set up several bins made of free wood pallets at the end of our yard and I add the leaves there. After you add the leaves and the bins seem full add little water and some mixing with the pitchfork and I get what I want, free dirt. 


You need to have at least TWO bins. You'll add material in bin #1 and then a week or two later you can toss bin #1's contents to the other bin. My local coffee shops, DunkinDonuts and Noble Roasters, help me by providing spent coffee grounds. Worms love coffee grounds. Making high quality dirt is easy and effortless. When I toss the contents of one bin to the next, I sprinkle some coffee grounds. As I do that I can hear the worms say "yum yum, yum".
If you don't mix your compost matter it will take about two years before it decomposes and it's usable. 


I always add my kitchen scraps there. I have a bowl next to the kitchen sink and throughout the day as I clean the vegetables, add the scraps in the bowl. The first two years the method worked like a charm. We consume lots of supermarket purchased fruits and vegetables and the scraps go in the compost heap. So far, so good. Supermarkets, though, add these stickers on everything to identify their goods. As you can see the avocado shell below has one such sticker. Quite the conundrum. YOU HAVE TO REMOVE THEM OTHERWISE YOUR FUTURE DIRT WILL BE FILLED WITH THESE STICKERS! They are made of some sort of material that will be in your garden for many years to come. 


By the way, out squirrels love to eat the material left on the avocado shell. We all have to live...

On my way home today I saw one of my neighbors had chopped down several small trees as he is working on a project. Well, tomorrow morning I will pay him a visit and get a few buckets of those wood chips. It will be such a great addition to my compost heap.


Keep on mulching!

Saturday, March 27, 2021

I just planted a few potatoes the Ruth Stout way, the lazy way

Ruth Stout,  (June 14, 1884 – August 22, 1980) she was an author of gardening books and a "lazy" gardener. She pioneered the deep mulching method that basically eliminates watering and weeding gardens. I learned about her method by watching a film strip, remember them?,  back in the early eighties while I was attending ECCC in upstate NY.

Here is a quick-and-dirty video that demonstrates her way of "planting" potatoes.


The soil in this garden bed is rich in nutrients and has already been used for three years. Basically, you place the potatoes on top of the garden bed and then you cover them with lots of hay. Hay was Stout's prefered milching material. She didn't like leaves and she didn't use straw either. She said NOT to pull any weeds that may come up, but to just add more hay on top of the weeds to kill them.

You can find "bad hay" very cheap if you check your local Craig's List or at any local farms. Usually they go for $2 per bale and I use about four bales every year. 


Friday, March 26, 2021

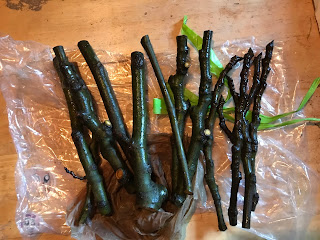
Processing My Newly Arrived Celeste Cuttings

Celeste is commonly referred to as sugar fig due to its sweetness and it's considered a dessert fig, but can be used for drying and making preserves. It produces fruit about medium in size and has light brown to purple skin and bright pink flesh. One great advantage of this variety is the fruit is closed eye which discourages fruit beetles.

The trees are very cold hardy down to HZ 6. I do live in New York state and this is VERY important to me. Our winters are cold and we get quite a bit of the white stuff. 

I bought these cuttings from an Etsy seller. They advertised 10 cuttings for $16.00 plu shipping. I thought the price was reasonable and I went for it.  It took them two days to ship them, I thought that was reasonable, and then two additional days for me to receive these cuttings. If I had a penny for every time I tracked the package I'd be a rich American. 

The package came via USPS and it was clearly marked that it contained live plants. Sweet! 

I opened the outer package and inside I found the cuttings wrapped in a plastic bag. The bag was securely sealed with easy to open ties.

Inside the bag I found 12 cuttings! The original offer was for 10 cuttings. At that moment I knew they were working hard for a good Etsy review. The bottoms of the cuttings were wrapped in a wet paper towel. They do that to keep the alive during shipping. 


Using a mat knife I removed from the bottom of each cutting the bark to expose the cambium layer in order to promote root growth. 


After I removed the bark of the cuttings I set them in three separate plastic containers that were 3/4 full with regular tap water.


The cuttings need to be near light BUT NOT in direct sunlight. 


Cover each bucket with plastic to keep the cuttings nice and moist. Change the water one a day RELIGIOUSLY. In about four weeks you will see roots growing. Watch out for an update in a month or so. 

 Cloning figs with cuttings is a very slow process similar to watching elephants mate. Be patient...

Wednesday, March 24, 2021

Taking advantage of great supermarket bargains

Recently I was shopping at my favorite supermarket, Adams in Newburgh, NY, America, where they have a very nice vegetable section where I saw the "bargain" cart loaded with packages. Normally that's the first area I go to because I always find great bargains there especially after holidays. 

This time they had bundled organic dill with spinach, leek and parsley. Each package had my name written all over it and it was very generously stuffed. Just the dill had an original price tag of $3.79 on it. I was buying $19 worth of stuff for $3. 

Most times I cook whatever I buy from that bargain cart the same day, but sometimes I choose to either freeze or dry it. The dill is already tied up with string and hung outside on the grapevine trellis to dry in the sun. At night I bring it inside the house because of the morning dew that will rehydrate the herb. If it's sunny and not too humid it will dry in 2-3 weeks. Then I take it indoors for further processing. I made a good video about processing my own dried herbs and you can watch it here. This time I will dry enough dill to last me sever months. I will add it to my world famous spinach pie and fish recipes. 


The point I'm trying to make is that you should take advantage of these special offers in order to stretch your money to its fullest. 


Language barriers from an Immigrant's perspective

 This is the quintessential immigrant video. I talk about problems that I've encountered in my American life with my accent and mispronouncing words. 

I forgot to include the difficulty I had with the Spanish name Jesus where in Spanish it is pronounced "hay-SOOS". 

Here is my YouTube video where I talk about three different situations I've encountered as an innocent immigrant.